Object Settings
Object Settings are a powerful array of tools that allow you to manipulate the form of the object.
Object Type
There are two types of objects you can manipulate in POTTERWARE:
POTTERWARE Object, which is an object defined by the PROFILE tools on the right side of the screen.Uploaded Object, which is an imported .OBJ file. You can upload using theUpload .OBJbutton on the lower right side of the screen.
.OBJ files may need to be optimized to load properly. Consult the Preparing OBJ Files page for helpful tips on creating, finding, loading, and troubleshooting your .OBJ files.

The default POTTERWARE object, which can be modified with all settings

An imported .OBJ converted from Twisted Heart Vase by Gyrobot on Thingiverse.
Layer Height
This describes the height in the Z axis from layer to layer, expressed in millimeters. POTTERWARE is set to 1.4 millimeters by default and is optimized for a 4mm nozzle size.
The amount of clay extruded from the printer is based on the size of the attached nozzle and extrusion speed of your printer, but this setting lets you configure how compressed or "squished together" those layers should be. Low layer height will be very tight/squished and high layer height will be very loose and noodle-like.
You may opt for a greater layer height when using a larger diameter nozzle, or a smaller layer height if you want a higher resolution.
If you are using vertical wave effects with high amplitude or many tight repetitions, we recommend increasing the layer height to prevent the nozzle from scraping against or tearing your previous layers. Clay may get stuck to your nozzle tip and prevent your subsequent layers from printing smoothly.
Object Height
This determines the height of your POTTERWARE Object in millimeters (1" is 25.4mm). Your piece can go from 4mm to 1500mm tall. The default value, 85, is about 3.3”.
POTTERWARE Objects, not Uploaded Objects.Object Sides
This will determine how many sides your POTTERWARE Object will have. For example, a 4-sided object will have a square base, and an 8-sided object will be an octagon. The default setting is 100, which will give the sense of a circular base profile.
POTTERWARE Objects, not Uploaded Objects.Object Twist
Adding a twist rotates the top surface from the bottom surface in 0-1800 degree increments (default: 0). Setting this value to 360 will completely rotate your shape one time.
Horizontal Profile
Choose between Angular and Smooth. A four-sided object with an angular profile will have a square horizontal profile with sharp corners, but a smooth profile will round the edges and transform the square into a "squircle".
Below, the default POTTERWARE object was set to 4 sides. Note the difference in dimensions when the Horizontal Profile changes. At this low number of sides, the Smooth object isn't quite circular.

A 4-sided POTTERWARE object with a Smooth horizontal profile

A 4-sided POTTERWARE object with an Angular horizontal profile
Scaling Options
Choose from Uniform Scaling (default), Non-Uniform Scaling, or Scale to Length.

The Uniform Scaling setting maintains the aspect ratio as it shrinks and grows the base object

The Non-Uniform Scaling settings can be used to create ovals and non-circular shapes

Using Scale to Length forces each cartesian axis to fit within a specific size
Scale Uniform
This will shrink or enlarge your shape while retaining the same aspect ratio and proportions. The X, Y, and Z axes are all scaled by the same amount. Objects are scaled by a percentage of 100. In other words, a uniform scale of 2 will scale your object to 200%.
Uniform Scaling is selected.Scale X, Y, and Z
Scale your object independently in each cartesian axis (X, Y, or Z) by a percentage of 100. In other words, a uniform scale of 2 will scale your object to 200%.
Non-Uniform Scaling is selected.Scale X, Y, Z to Length (mm)
Scale your object to a precise dimension in millimeters in the X, Y, or Z axis independently.
Scale to Length is selected.Seam
When your design is printed, the movement from one layer to the next can create a transition or "seam", or visible line. To view the seam, use the Curves visualization mode.
Seam Adjustment
Choose between Fixed and Aligned with Twist. A fixed seam will occur in the same position each time, and an aligned with twist seam can become somewhat hidden based on your design.
Seam Position
Change the location of your seam if it is interfering with a focal point in your design. Setting the seam position to the highest value will rotate it fully around your design; a midpoint will rotate the seam 50%.
Seam Length
Create a smoother transition from layer to layer by lengthening the seam length. Increasing the length makes the printer head's movement less abrupt. Think of low values as a staircase and high values as a ramp.
The seam length is measured in millimeters.
Image Map
Upload a JPG or PNG image that will wrap around your POTTERWARE object.
Your image will conform to the shape of your POTTERWARE object, so an image that is too narrow or short to fit the form will become distorted. If you would like to prevent the stretching or squishing, you can design your image so that it is optimized for your form.
Color and greyscale images can both be used, but it may be easier to visualize the contrast between lights and darks with a greyscale image. Transparent PNGs will be "flattened" to a black background; if your image was black too, that means it won't display at all. We recommend avoiding transparency.
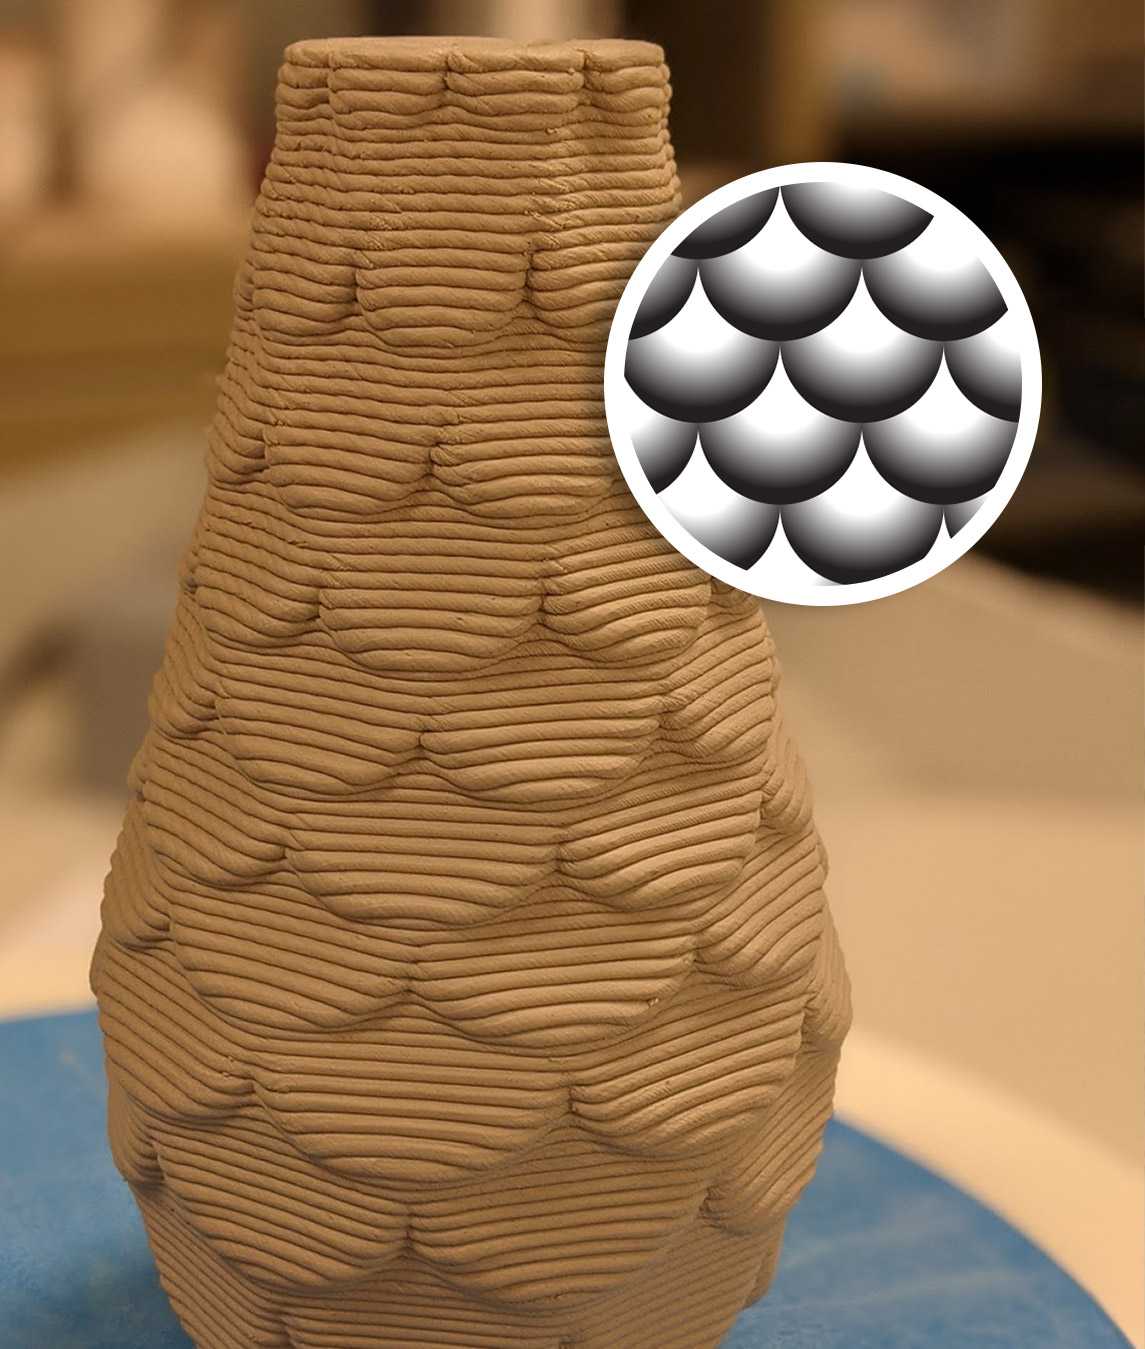
Stephy Miehle created her fish scale bottle by designing a seamless pattern with a black-to-white gradient
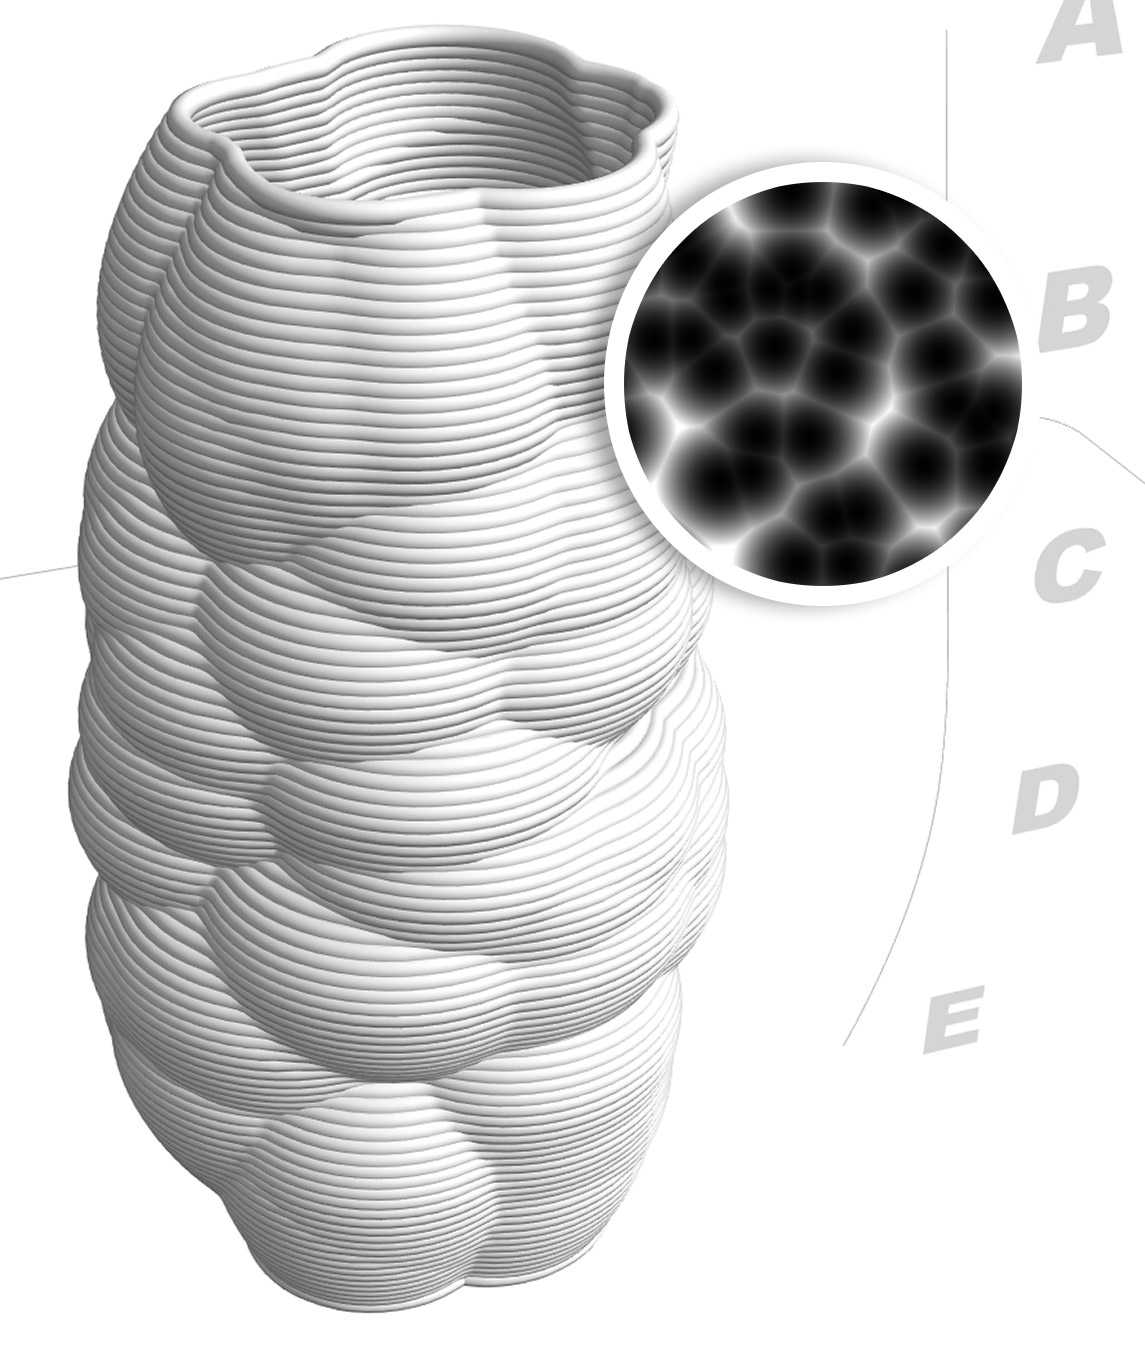
The Voronoi-style displacement map turned a cylindrical form into a complex form with hills and valleys
Successful Image Tips
High-contrast designs will result in the most dramatic results; designs that are too subtle may be hard to see when printed.
Complex designs at the very top or bottom of your image can cause unexpected results, especially with a high amplitude. Adjusting the Smoothing can help.
Clay is not printed in high resolution; tiny details will likely get lost. Your layer height and nozzle size will affect the level of detail in the final print.
If you are using a pattern, try to design or find one that is "seamless" so that the pattern connects/repeats at your object's seam.
For more information, check out the Clay Bottress blog post on image mapping.
Image Amplitude
How "in" or "out" your design should be from the surface. Negative values will push your image design to the outside, and positive values will "indent" the design in your form.
Remember that gravity will have an effect on your design! Very low- or very high-amplitude designs may droop if there is nothing to support the extruded layer.
Image Amplitude is also affected by the lightness and darkness of the design itself. Darker values are amplified more than light values. For further reading, research "displacement maps" as they apply to 3D modeling.
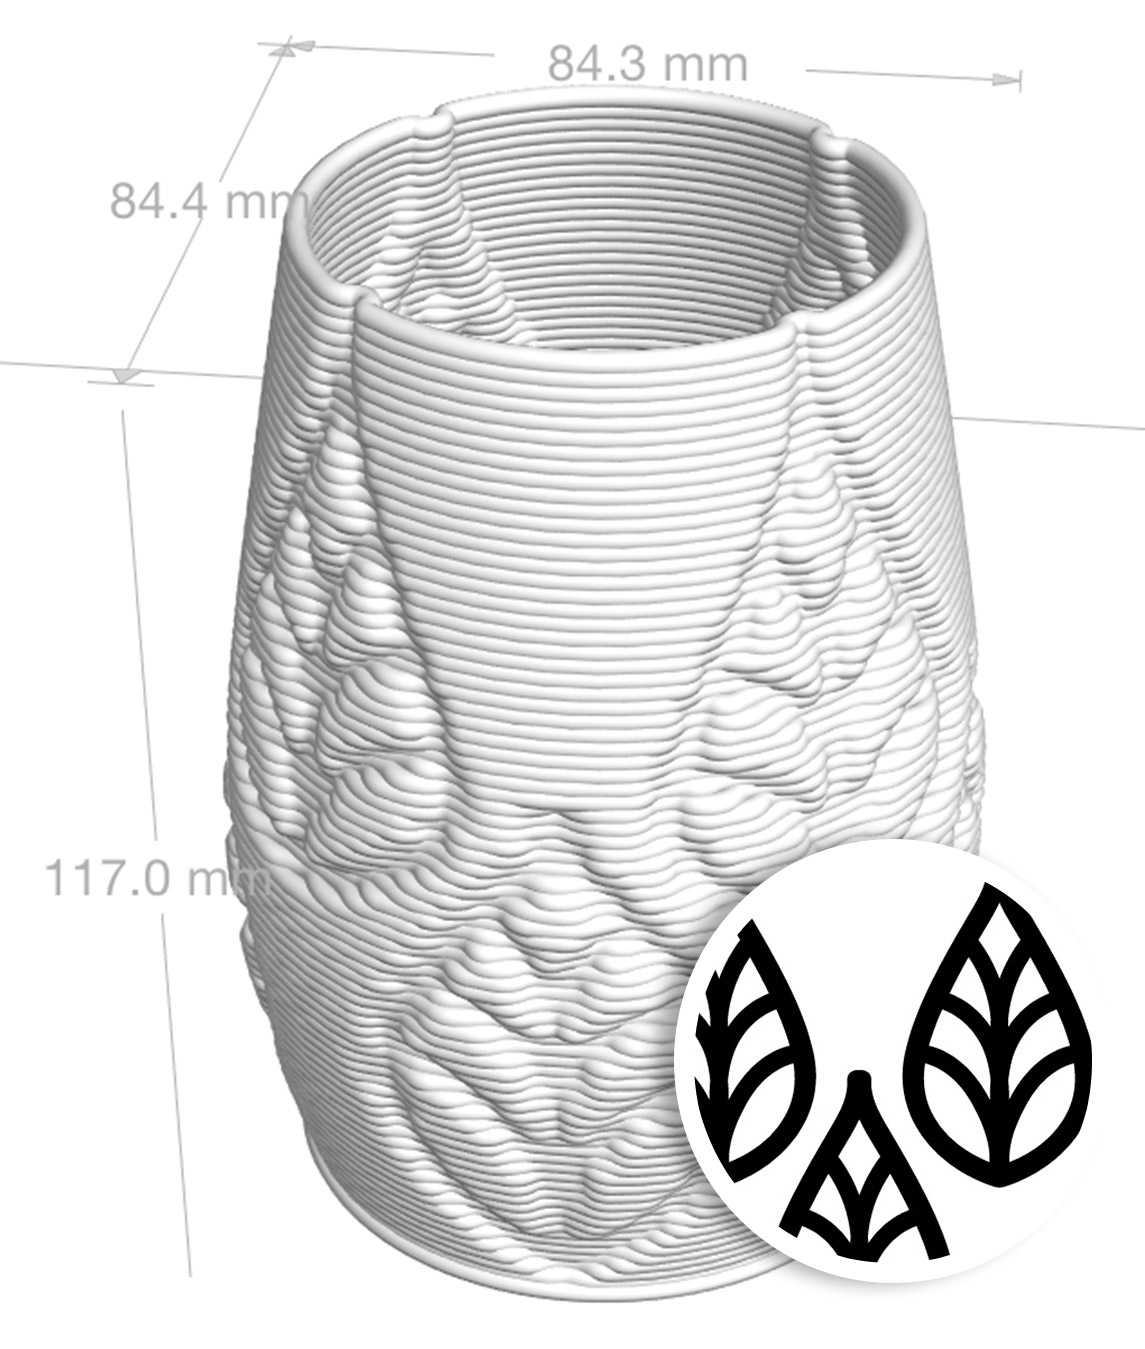
All of these forms use negative amplitude; the leaf design to the left has the lowest (most extreme) amplitude. All forms were created with high-contrast designs by Stephy Miehle.
With positive amplitude, the same leaf design takes on a whole new style. Now, the negative space creates the interesting design on the surface.
Image Map is selected.Smoothing
Smoothing will soften the generated image that POTTERWARE wraps around your form, which can result in gentler transitions between the main surface and mapped image.
If your design creates unexpected lines within the POTTERWARE form, try increasing the Smoothing setting to get rid of them.

The lines spanning across the form were an unintentional quirk, but increasing the Smoothing got rid of them

If you see it on screen, you'll see it in real life; this design was printed before the smoothing was adjusted and corrected
Image Map is selected.